What is HDR and why do we need it?
A camera is capable of capturing a limited amount of tones in a single photo (we call this dynamic Range, the range of tones that can hold detail between pure black and pure white). Typically we sacrifice elements in a photo when we set the cameras exposure. We meter for the most important part of the scene. For example let’s look at the series of images below. The center image is a typical exposure, showing an average metering to produce the most detail possible. Notice that the detail outside the door is lost because it’s too bright. Also the detail on the stair rail is lost because it’s too dark. When you are at the location, you are able to see all these detail with your eye, this is because the human eye can see a larger range of tones than the camera can capture on the sensor or film in a single photograph.
The solution is to take more than one photograph and bracket the photos. Shoot a normal exposure (center image), then under-expose (left) to capture the highlights outside the windows and over-expose (right) to capture shadow detail. Finally, merge these photos together to produce a single image with a larger range of tones that can now show all the details in the shadows and highlights.
This tutorial will show you how to complete this process with the minimum fuss.
This tutorial will show you how to complete this process with the minimum fuss.
HDR in Photoshop tutorial
Step 1
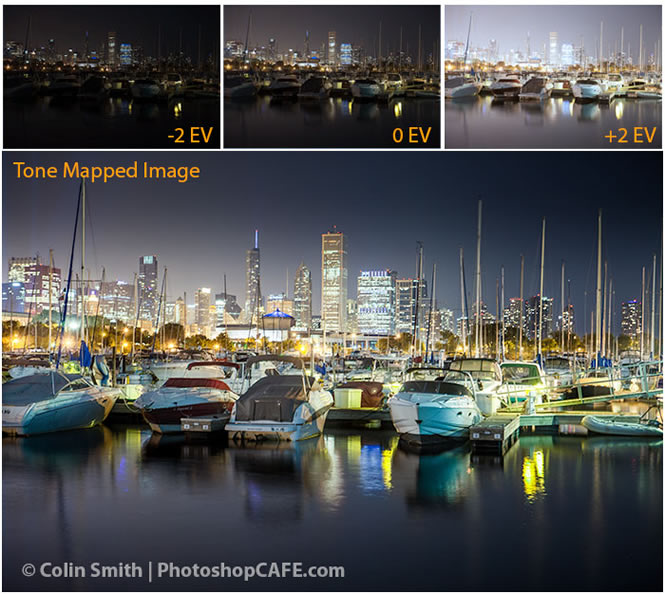
Make sure you shoot in Aperture Priority or in Manual. You want to bracket the exposure time, not the Aperture. If you change the aperture, the depth of field won’t be consistent and you’ll get blurring. Also avoid any moving subjects in the photo or you’ll get “ghosting” where something is only in one frame and will appear very strange in the final. If you look at the three image that I used here, the middle image has a lot of detail. However, the details in the shadows are lost in the boats and the city lights are too bright and lose detail information. The left image is under exposed to pick up the details in the highlights such as the buildings in the background. The right hand photo is over exposed by 2 stops to pick up the detail in the shadows, such as the hulls of the boats and water reflections.
step 2
Time to merge the photos together into a single 32 bit image.
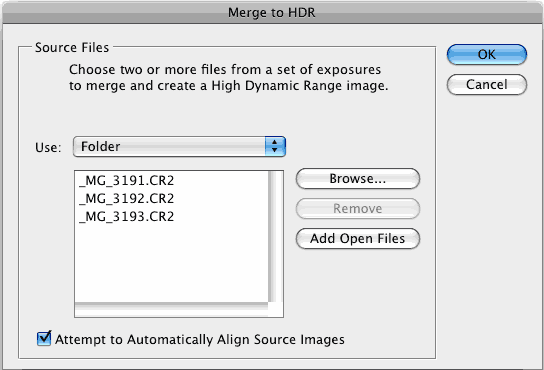
Choose File>Automate >Merge to HDR Pro. This works on Photoshop CS2 – CS6 (CS2 Doesn’t have auto align and it’s called “Merge to HDR on versions older than CS5). Choose either images or folder. I organize each set of photos in its own folder so I used the folder option. Select your photos to merge. Turn on Auto Align in Photoshop CS3+. Click OK. (Photoshop uses Auto-align technology that even allows you to create HDR without the use of a tripod!)
Choose File>Automate >Merge to HDR Pro. This works on Photoshop CS2 – CS6 (CS2 Doesn’t have auto align and it’s called “Merge to HDR on versions older than CS5). Choose either images or folder. I organize each set of photos in its own folder so I used the folder option. Select your photos to merge. Turn on Auto Align in Photoshop CS3+. Click OK. (Photoshop uses Auto-align technology that even allows you to create HDR without the use of a tripod!)
Step 3
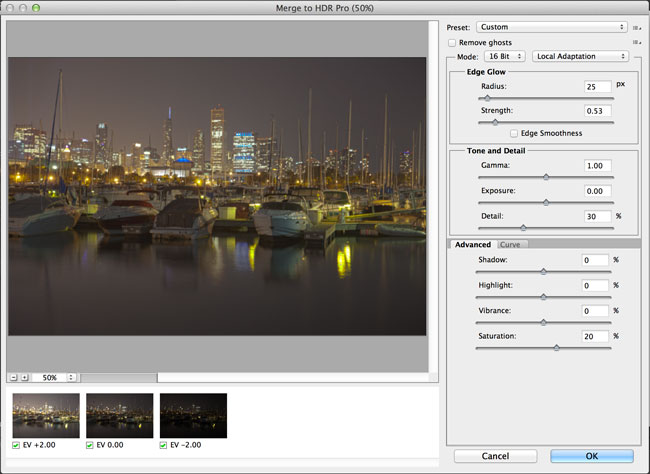
Your images will now be merged into a single photo. You can turn off individual photos by un checking their boxes on the left filmstrip. If you get some blurring caused by camera shake in the longest exposure, you may want to turn off that photo. If there is ghosting because of movement, click the box: Remove Ghosts.
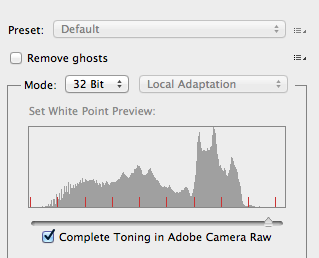
(When the mode is at 16 or 8 bit you will see settings like this, if 32 bit is selected, it will look like step 4)
(When the mode is at 16 or 8 bit you will see settings like this, if 32 bit is selected, it will look like step 4)
Step 4
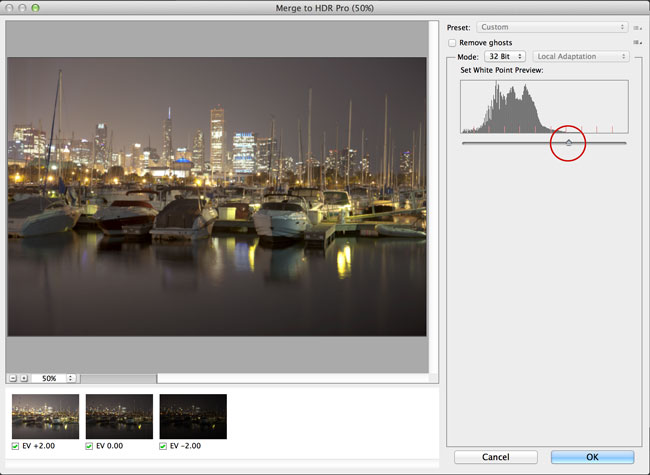
The merged result is a floating-point 32 bit image. Change the mode to 32 bit. You can view the available tones by sliding the White Point slider. Note, this slider doesn’t change the image, it is there for you to examine the range of tones, because a monitor is incapable of displaying all the tonal detail in a 32-bit file all at once.
If you are on CC and the “Complete Toning..” button is turned on, you won’t be able to move the slider. Click the option off and you will be able to move the slider and continue with the rest of the tutorial just like in CS6.
However, when the option is turned on, you will be able to use Camera Raw for the Tone Mapping instead of the HDR Pro settings. In this case, skip to step 8b.
However, when the option is turned on, you will be able to use Camera Raw for the Tone Mapping instead of the HDR Pro settings. In this case, skip to step 8b.
However, I recommend learning both methods as they each have merit. The HDR Pro tone mapping (step 5+) will give you more control and enable you to create a surreal effect as well as powerful HDR controls. ACR (Camera Raw) has the advantage of being able to do very realistic HDR tonemapping without too much effort.
STEP 5
You could do your tonemapping right now if you like, but I like to save a 32bit negative. Click OK to merge the photos into a 32 bit image. Now is a good time to save your file. Save as a psd, tif or open EXR.
STEp 6
In order to use the photos, you’ll need to convert them to 16 or 8 bit images. When we convert them we will create what I call interpretations of the photo. The reason I say this is because we have unlimited ways we can make the photo look. While we have this huge dynamic range available in 32 bit, we will no longer have those options after conversion. Always work from the saved 32 bit version, and then convert and save versions (personal interpretations). Avoid overwriting the 32 bit image, it’s our master and we may want to go back to it many times.
Choose Image>Mode>16 bit (or 8 bit). Now we get to play with some fun options. You’re now at the tone mapping part of the process. This is were all the creativity can ooze.
(If you want to make the adjustments without converting, choose view>32 Bit Preview Options. You can use several of Photoshop’s tools in the Image>Adjustments menu. The most important of these is the Exposure control)
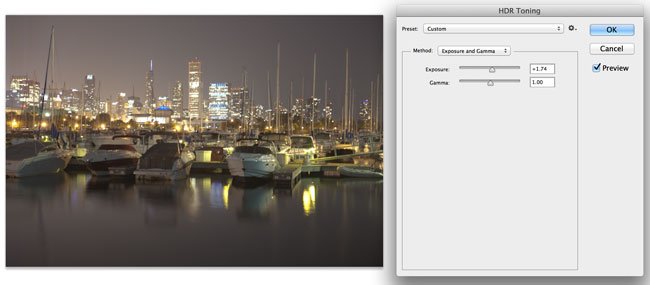
You’ll see an HDR Toning Dialog box (HDR Conversion for versions before CS5). Exposure and Gamma is the default option. Best way to approach this? Set the gamma first, then adjust the exposure to suit. If you want an image with lots of contrast, lower the gamma. For less contrast raise the gamma. Finally, adjust the exposure to get the desired brightness. If you want more control, read on… otherwise press OK to convert.
STEp 7
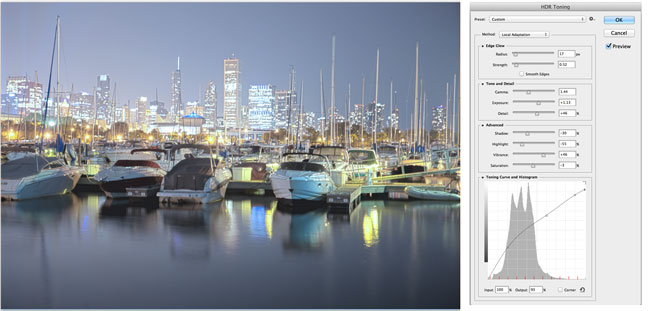
Change the Method to Local Adaption. (There are 4 available methods, but these are the only 2 with user input).
With local Adaption, you get some advanced Tone Mapping sliders and you can adjust the curves. The use of curves is optional as they allow you to fine tune the other settings. Set these like you would normally work in curves, but don’t be afraid to clip the histogram a little. You can clip because you’re working with a larger dynamic range than you’re used to. Bring out the detail in the image, but don’t forget to put some shadow in there or it will look washed out and fake.
Edge Glow
Once your happy with the curve, adjust the radius and strength sliders to make sure there are no halos in the photo. (Badly converted HDR images have a glow around the areas of contrast.) The radius controls the mask blur while the strength decides how strong to apply the effect.
Tone and Detail
Gamma: This is where you control the contrast. Extremes are washed out or super punchy.
Exposure: Controls the overall brightness.
Detail:This sharpens or softens the appearance.
Advanced
Shadow: Opens up details in darkest parts of the photograph.
Highlight: Recovers detail in the brightest areas of the photograph.
Vibrance: This makes the photo more colorful without over saturating areas that are already colorful. (It’s smart).
Saturation: Increases or decreases the overall amount of color. Be careful not to over saturate the colors as a rule. (Of course all rules can be broken on occasion).
Click ok to convert.
STEp 8
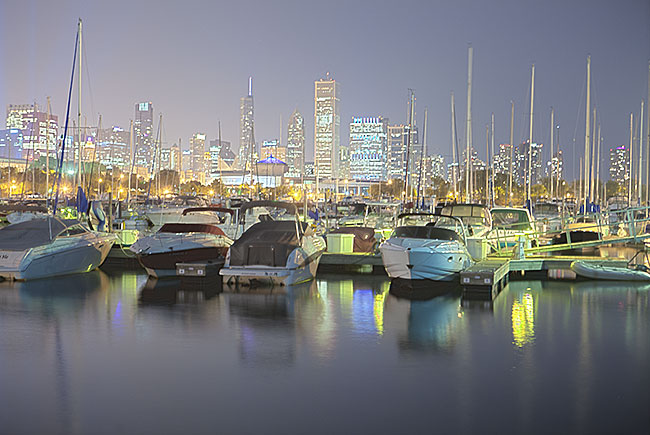
Here we have a merged image from HDR. Photoshop is great for producing very realistic HDR images.


