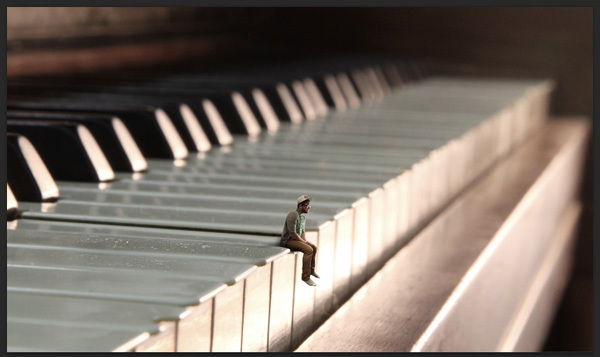
Miniature Tutorial

In this tutorial, I will show you how to create a surreal, miniature portrait using some photos that you can download below. In the process, I will explain several photo manipulation techniques to create a realistic photo illustration.
When you are finished please place a jpeg in the final images folder with the label: yourname-piano.jpg.
REMEMBER when you are finished to "Save As" and change the file extension to: .jpg
Let's get started.
When you are finished please place a jpeg in the final images folder with the label: yourname-piano.jpg.
REMEMBER when you are finished to "Save As" and change the file extension to: .jpg
Let's get started.
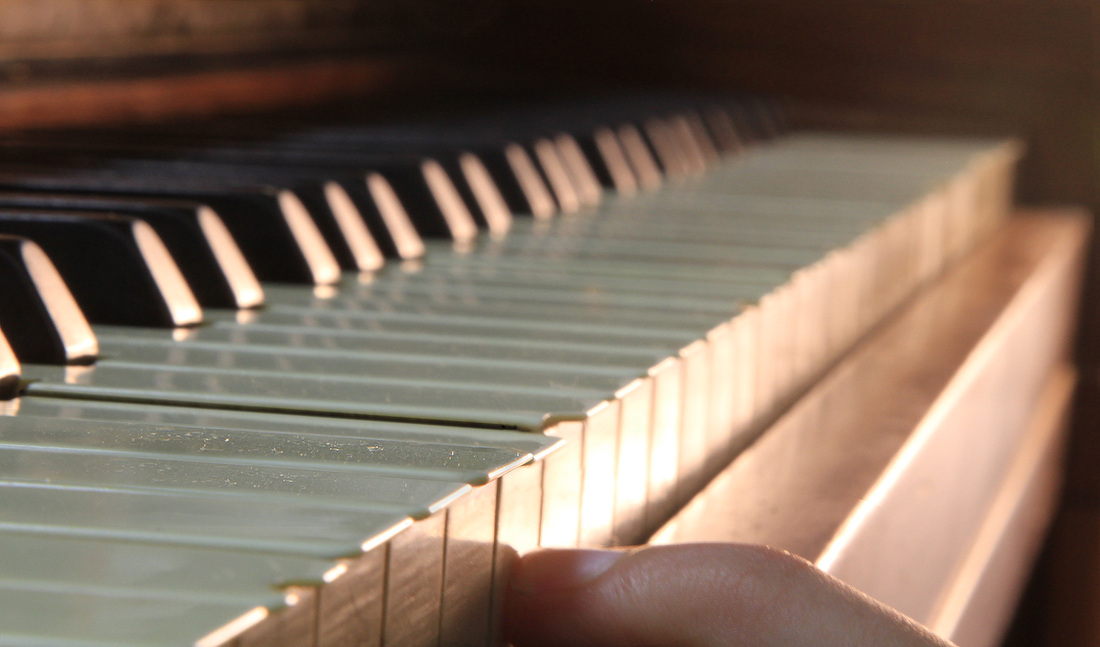
| background_1.jpg |
| background_2.jpg |
| model-source.jpg |
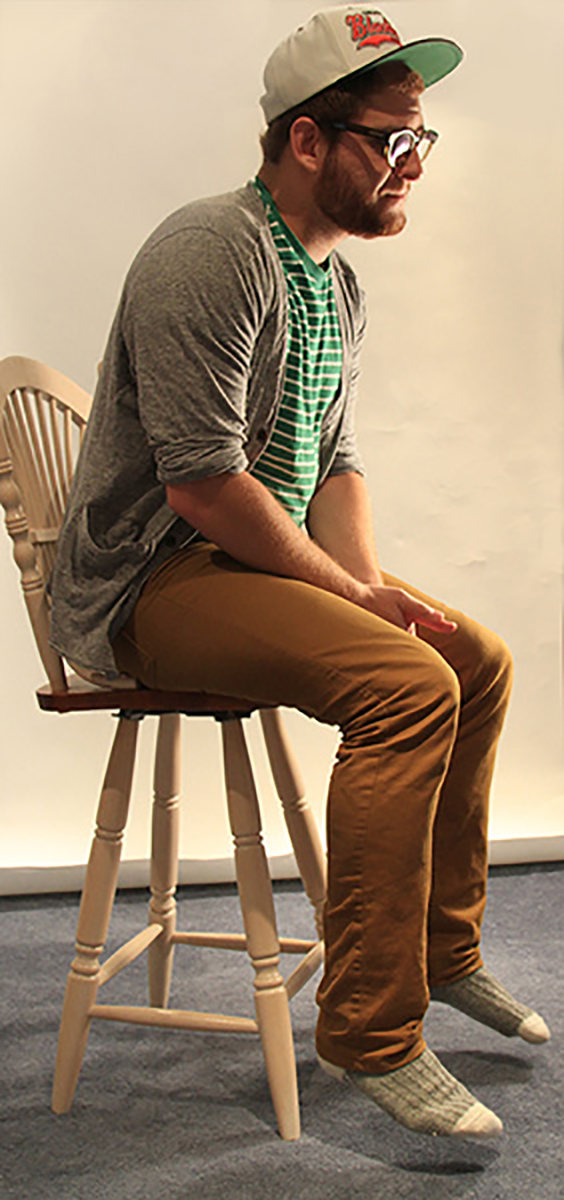
Lay the foundation
Step 1
Open up the two background images and place them into the same document as layers.
Open up the two background images and place them into the same document as layers.
Step 2
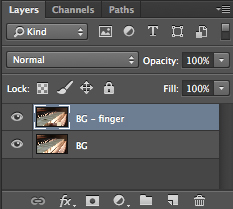
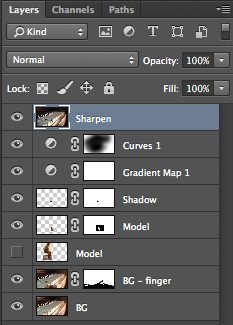
Make sure the image of the pressed key is on the top layer. You can either click and drag the layer on top of the other in the Layers panel, or use Ctrl to move the layers up and down. I chose to name the bottom layer BG, and the layer above it BG - finger. It should look like this:
Make sure the image of the pressed key is on the top layer. You can either click and drag the layer on top of the other in the Layers panel, or use Ctrl to move the layers up and down. I chose to name the bottom layer BG, and the layer above it BG - finger. It should look like this:
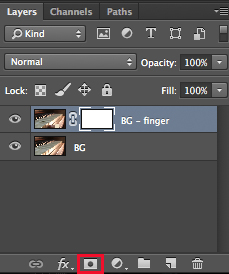
Step 3
Create a Layer Mask for the BG-Finger layer. The Mask button is located at the bottom of the Layers panel.
Create a Layer Mask for the BG-Finger layer. The Mask button is located at the bottom of the Layers panel.
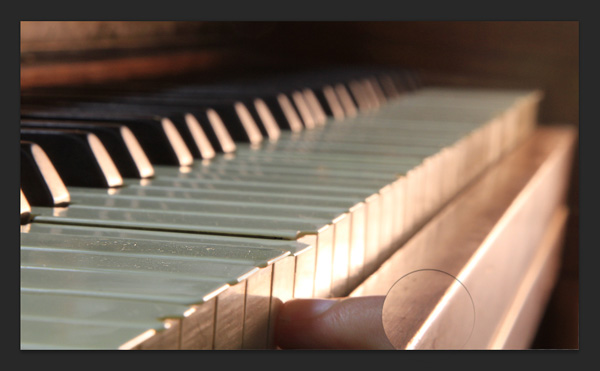
Hit B to select the Brush tool and make a hard, large brush. Make sure your foreground Colour is Black and Opacity is set to 100%. Begin to paint over the finger, as well as the shadow the finger has created. When you are painting, make sure to select the layer mask first.
2 - Place the model
After masking out the finger, you should now have a nice clean image of the piano and lowered key. It is now time to start placing the model.
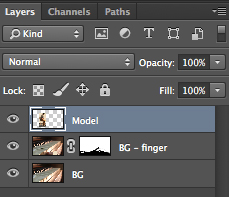
Step 1
Open up the model file and paste it into the document. This will create its own layer. Make sure it is the top layer. Name it Model
Step 1
Open up the model file and paste it into the document. This will create its own layer. Make sure it is the top layer. Name it Model
Step 2
Use the Quick Selection (W) tool and start to select the model's figure. There are many different ways to select and isolate objects in Photoshop, but for this tutorial, I will show you the Quick Selection and Refine Edgeway. Feel free to use the method you are most comfortable with.
Use the Quick Selection (W) tool and start to select the model's figure. There are many different ways to select and isolate objects in Photoshop, but for this tutorial, I will show you the Quick Selection and Refine Edgeway. Feel free to use the method you are most comfortable with.

Step 3
As you continue to select the model's figure, the Quick Selection tool might accidentally grab some background, as well. This is normal. To fix this, make your brush a bit smaller and use the Alt button to control the plus and minus for the selection. Your selection should look like this.
As you continue to select the model's figure, the Quick Selection tool might accidentally grab some background, as well. This is normal. To fix this, make your brush a bit smaller and use the Alt button to control the plus and minus for the selection. Your selection should look like this.
Step 4
Once your selection is complete, click on the Refine Edge button that is located just above the image.
Note: You must have the Quick Selection tool active for this button to appear.
Once your selection is complete, click on the Refine Edge button that is located just above the image.
Note: You must have the Quick Selection tool active for this button to appear.

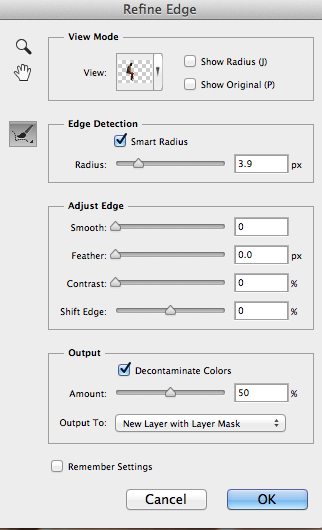
Step 5
Refine Edge will open up a menu with a bunch of options. Starting from the top, change your view to On Layers. Select Smart Radius and bring it up to about 3 or 4 pixels. Smooth the edge by about 20. Select Decontaminate Colors and ouptut to New Layer with Layer Mask. Click OK.
Refine Edge will open up a menu with a bunch of options. Starting from the top, change your view to On Layers. Select Smart Radius and bring it up to about 3 or 4 pixels. Smooth the edge by about 20. Select Decontaminate Colors and ouptut to New Layer with Layer Mask. Click OK.
Step 6
Once you click ok, you will see that you will have a copy of the model, and that layer will have given you a mask of your selection. This method will sometimes leave some areas that need some touching up. No problem. Zoom in and use a hard brush with 100% Opacity, and with the layer mask selected, simply paint away the excess like you did in the very first step.
Once you click ok, you will see that you will have a copy of the model, and that layer will have given you a mask of your selection. This method will sometimes leave some areas that need some touching up. No problem. Zoom in and use a hard brush with 100% Opacity, and with the layer mask selected, simply paint away the excess like you did in the very first step.
3-Re-Size and position the model
Step 1
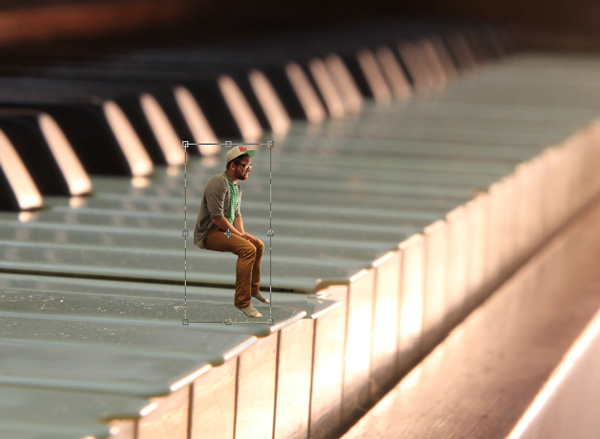
Select your model layer and press Ctrl-T (free transform). You will see a box form around the model. While holding Shift, click and drag one of the corners down until the model is the appropriate size. Hit enter.
Select your model layer and press Ctrl-T (free transform). You will see a box form around the model. While holding Shift, click and drag one of the corners down until the model is the appropriate size. Hit enter.
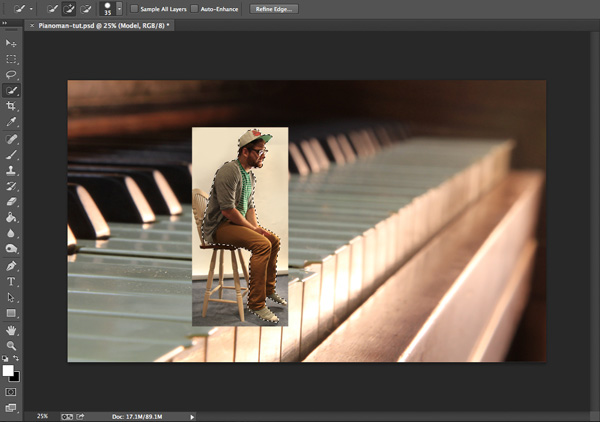
Step 2
Place the model in the appropriate spot at the end of the key.
Place the model in the appropriate spot at the end of the key.
4-Apply a shadow to the model
Step 1
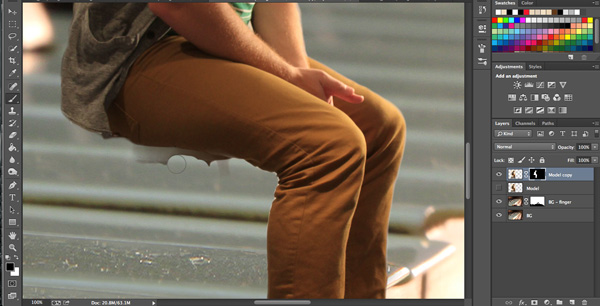
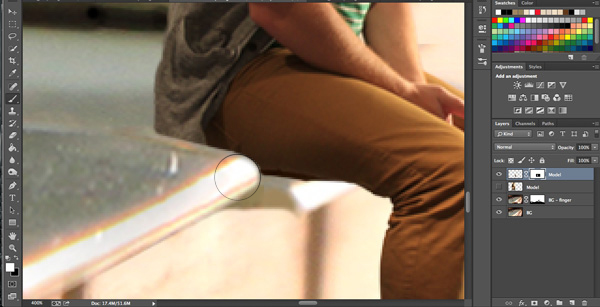
For this to look realistic, we need to add a shadow behind the model, but first we need to mask out a bit of the model's leg so that it appears to be behind the key. Pick a small, hard round brush and paint away some of the thigh.
For this to look realistic, we need to add a shadow behind the model, but first we need to mask out a bit of the model's leg so that it appears to be behind the key. Pick a small, hard round brush and paint away some of the thigh.
Step 2
Create a new layer Ctrl-Shift-N and name it Shadow. Using a medium-hard brush, black with 100% Opacity, paint a rough black shape that will resemble where the shadow would fall. Don't worry about it being perfect and don't worry about overlapping things. There are tons of ways to create shadows, but this way is very simple and easy.
Create a new layer Ctrl-Shift-N and name it Shadow. Using a medium-hard brush, black with 100% Opacity, paint a rough black shape that will resemble where the shadow would fall. Don't worry about it being perfect and don't worry about overlapping things. There are tons of ways to create shadows, but this way is very simple and easy.

Step 3
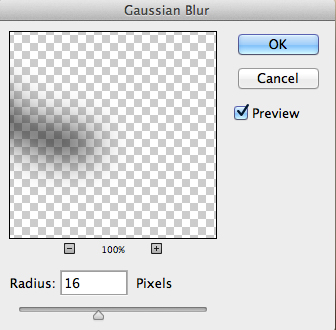
Soften the edges of the shadow by either going to Filter > Blur > Gaussian Blur or using a soft brush and masking around the edges. I chose to blur it around 16 pixels.
Soften the edges of the shadow by either going to Filter > Blur > Gaussian Blur or using a soft brush and masking around the edges. I chose to blur it around 16 pixels.
Step 4
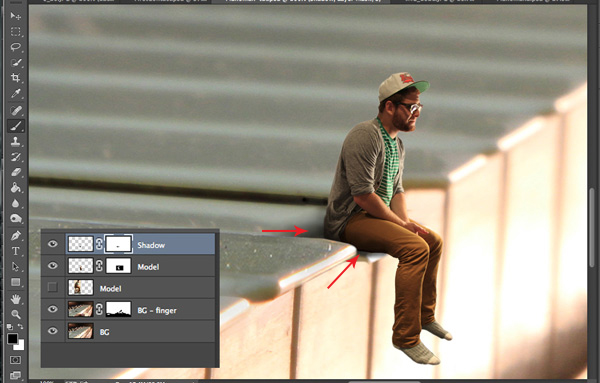
Add a mask to this layer and using a soft brush, begin to refine the shadow. Make sure your brush is black, and a low opacity of 10-30%. Pay close attention to the outline of the key beside the model and the leg area. Space that is directly beside the model should be almost completely black and should smoothly fade out. Keep working on it until it starts to look like this.
Add a mask to this layer and using a soft brush, begin to refine the shadow. Make sure your brush is black, and a low opacity of 10-30%. Pay close attention to the outline of the key beside the model and the leg area. Space that is directly beside the model should be almost completely black and should smoothly fade out. Keep working on it until it starts to look like this.
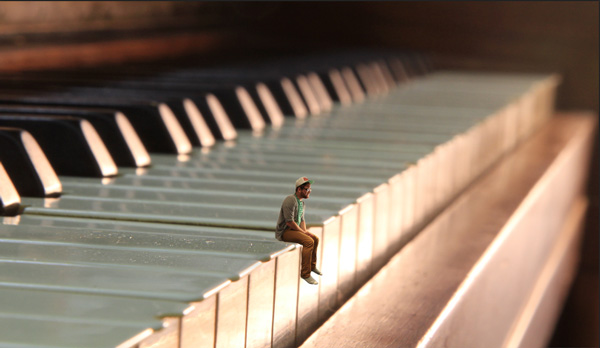
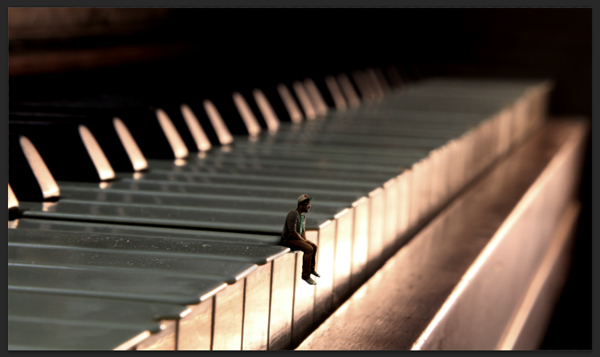
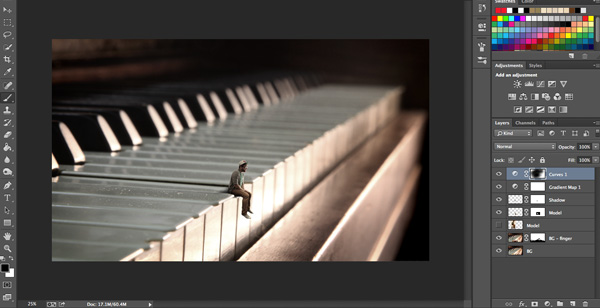
5-Colour effect and final output
This is where you can be creative and export the final photo with your own colouring style. These last few steps show how I finalized this image.
Step 1
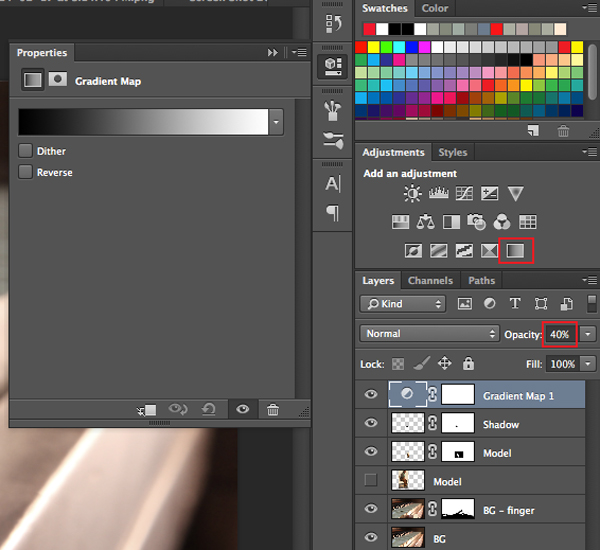
Create a Gradient Map adjustment layer. Make sure your foreground colour is black, and background colour is white. This will make your image completely black and white. Change the Opacity to 40-50% to dial it back a bit and make the image a nice moody, unsaturated scene.
Step 1
Create a Gradient Map adjustment layer. Make sure your foreground colour is black, and background colour is white. This will make your image completely black and white. Change the Opacity to 40-50% to dial it back a bit and make the image a nice moody, unsaturated scene.
Step 2
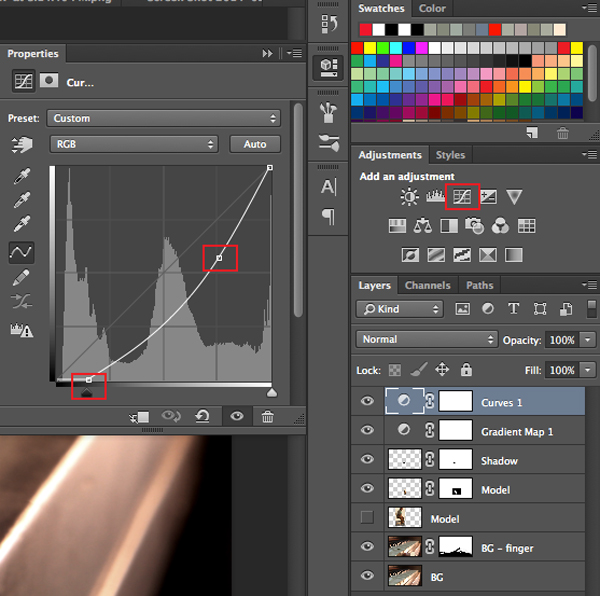
Next, create a Curves adjustment layer and match the curve points to how I have it in the photo. This will make your photo look really dark, don't worry that's normal.
Next, create a Curves adjustment layer and match the curve points to how I have it in the photo. This will make your photo look really dark, don't worry that's normal.
Step 3
Use your Brush (B) tool and make a large, very soft brush at around 40-60% opacity. Select the Layer Mask that comes with the Curves Adjustment Layer and begin to manually paint out some areas where it is too dark. Essentially what we are doing here is creating a vignette, but with more precision and control. It should look like this. Note the Curves mask.
Use your Brush (B) tool and make a large, very soft brush at around 40-60% opacity. Select the Layer Mask that comes with the Curves Adjustment Layer and begin to manually paint out some areas where it is too dark. Essentially what we are doing here is creating a vignette, but with more precision and control. It should look like this. Note the Curves mask.
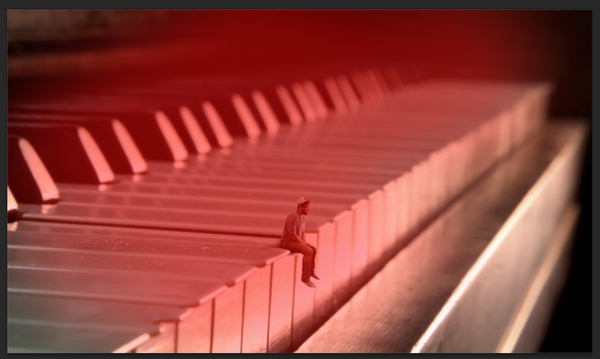
The red represents the area that I have masked out.
Step 4
The last thing we will do is add a bit of sharpening. Press Ctrl-Shift-Alt-E to make a copy of all the layers merged together. Make sure this layer is moved to the top. Name this layer sharpen.
Step 4
The last thing we will do is add a bit of sharpening. Press Ctrl-Shift-Alt-E to make a copy of all the layers merged together. Make sure this layer is moved to the top. Name this layer sharpen.
Step 5
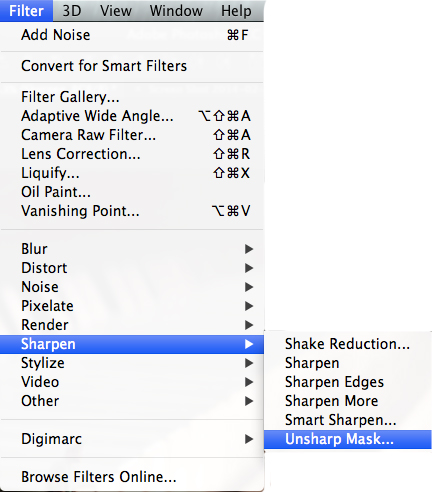
Go to Filter > Sharpen > Unsharp Mask
Go to Filter > Sharpen > Unsharp Mask
Step 6
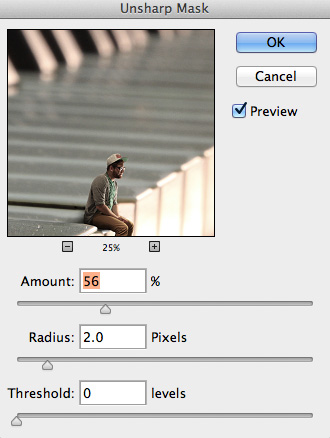
Move the amount slider to around 50-56 and a radius of 2 pixels.
Move the amount slider to around 50-56 and a radius of 2 pixels.
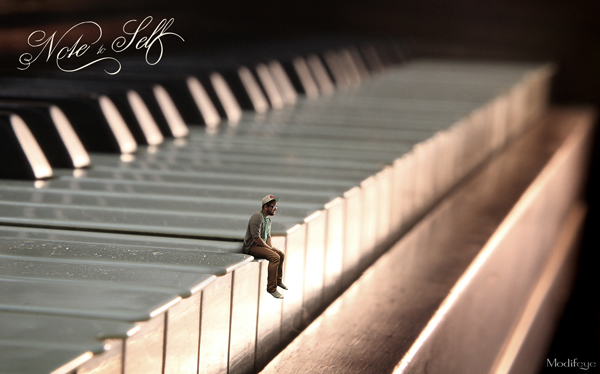
We've gone through all the necessary steps to create a pretty cool looking portrait! This tutorial is great practice to familiarize yourself with masking and selection techniques that can be applied on future projects. You can continue to make this photo your own with different colouring or even include some typography like I have chosen to do.