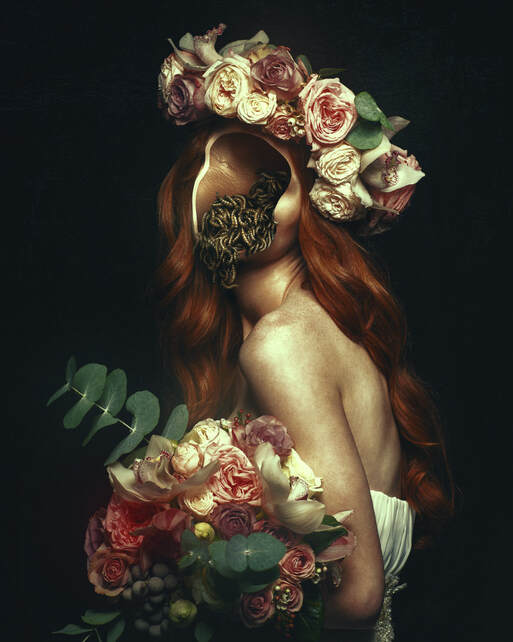
Haunted Portrait Effect
Video Reference
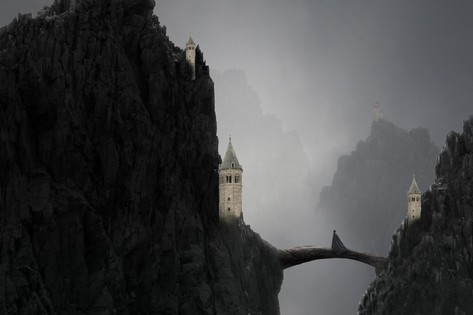
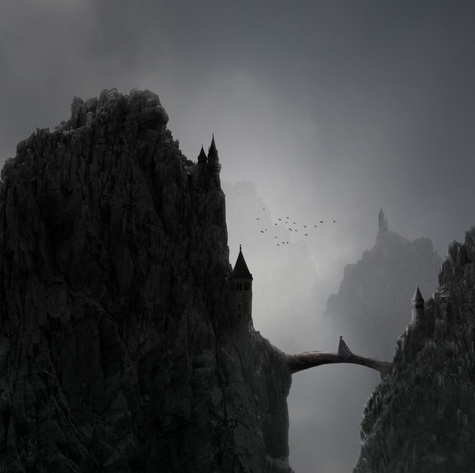
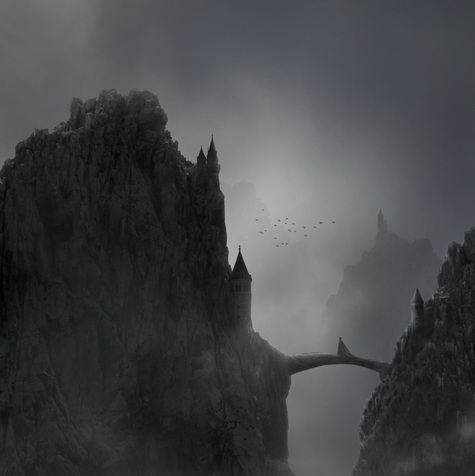
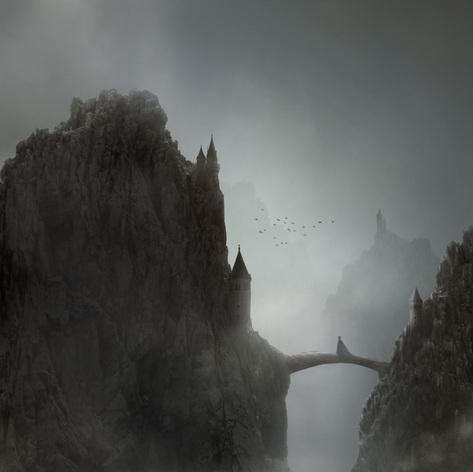
In this tutorial I'll show you how to create a misty landscape with rocks, an arch bridge, flying birds, castles, and a medieval woman. You'll learn how to combine simple images into a cohesive scene, play with the depth and atmosphere, adjust the colors, and more.
Tutorial Items to Download
The following assets were used during the production of this tutorial
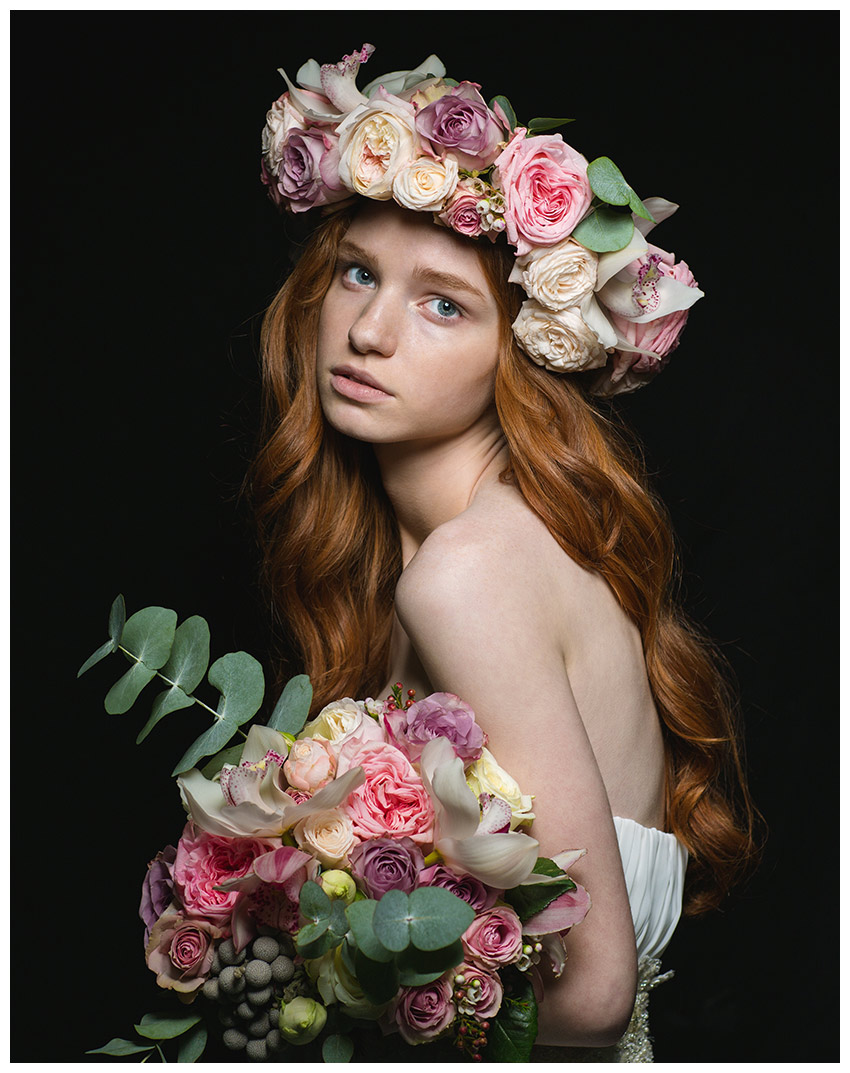
| original_portrait.jpg |
| antique_leather.jpg |
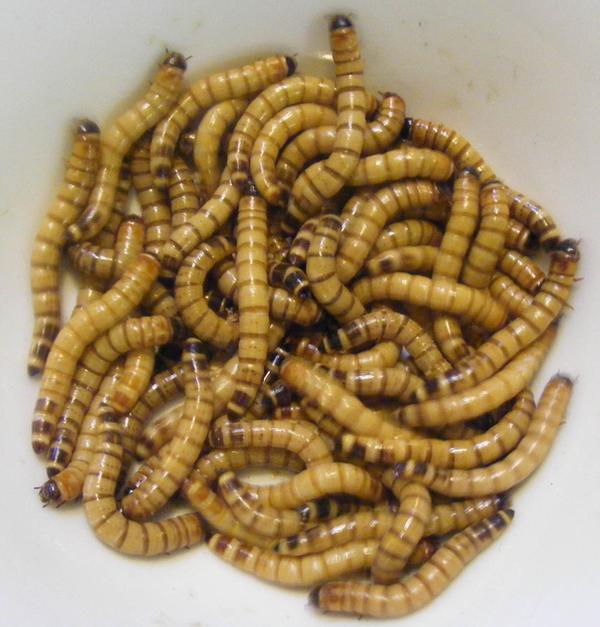
| king_worms.jpg |
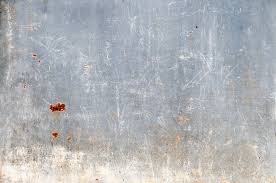
| rusted_background.jpeg |
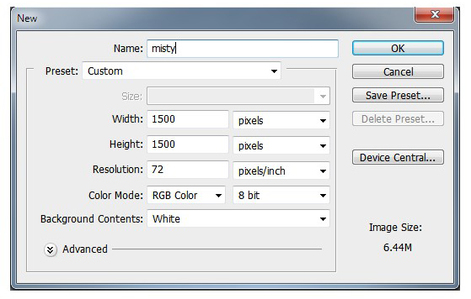
1. Add the Sky
Create a new 1500 x 1500 px document in Photoshop with the given settings:
Step 2
Open the sky image. Drag this image into our white canvas using the Move Tool (V):

Step 3
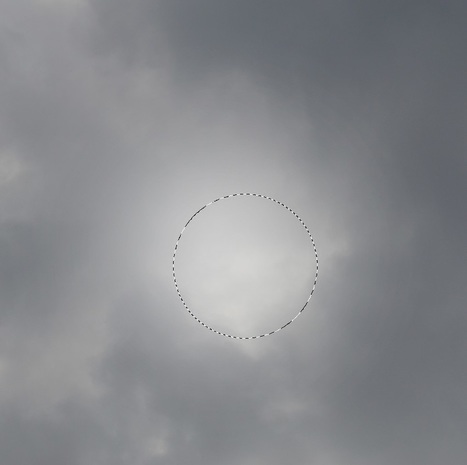
Lower the opacity of this layer to 70%. Click the second icon at the bottom of the Layers panel to add a mask to this layer. Use a soft round brush with black color (soft black brush) with the opacity about 30% to paint on the area near the middle section to reveal the light (from the white background). This step is to add some depth to the scene.
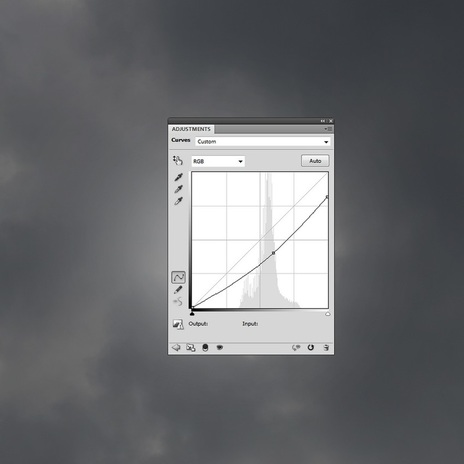
Step 4
Go to Layer > New Adjustment Layer > Curves and decrease the lightness a bit:
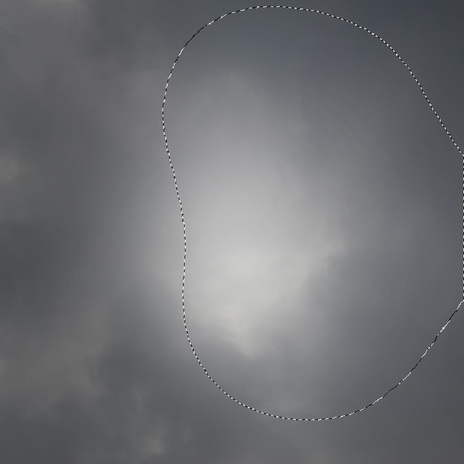
On this layer mask, use a soft black brush to erase the right side of the canvas—we aim to make the light come from the bright area near the section mentioned in the previous step, so this side should be a bit brighter.
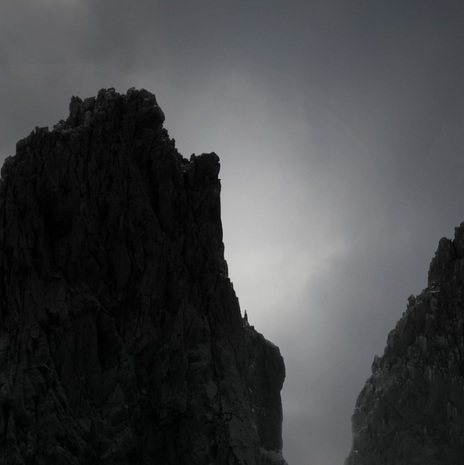
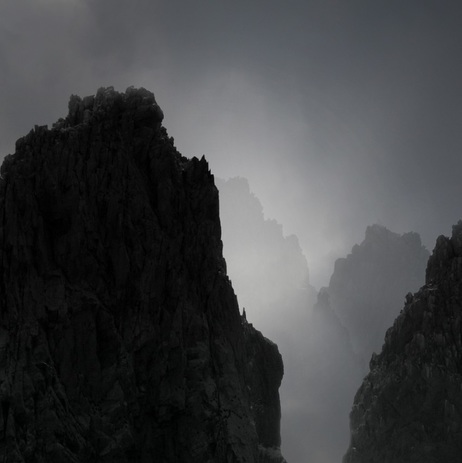
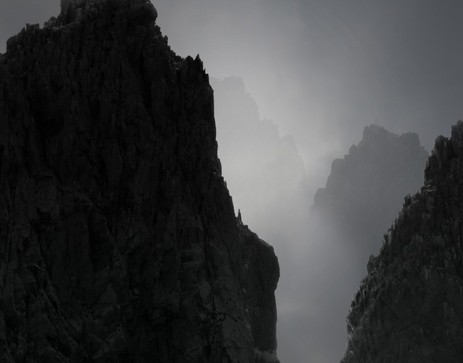
2. Add the Rocks
Step 1
Open the rocks image and isolate the rocks from the background. Add them to the sides of the canvas using the Move Tool and the Free Transform Tool (Control-T). Place the bigger rock on the left and hide a part of the light area—not much, but enough to draw the viewer's eyes to the light direction.
Open the rocks image and isolate the rocks from the background. Add them to the sides of the canvas using the Move Tool and the Free Transform Tool (Control-T). Place the bigger rock on the left and hide a part of the light area—not much, but enough to draw the viewer's eyes to the light direction.
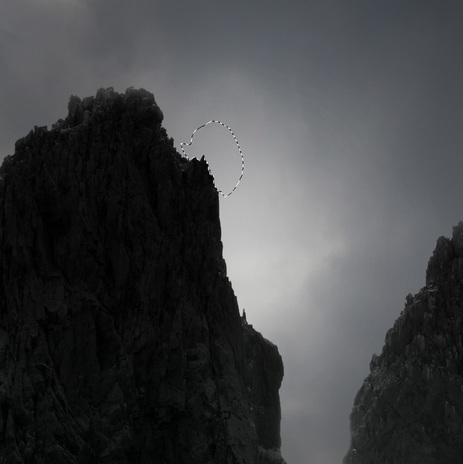
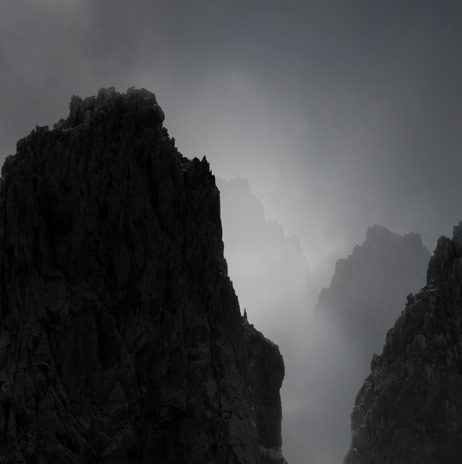
Step 2
Add a mask to each of these layers and use a soft black brush with the opacity about 20% to blur the top of the rocks to make them fade a bit into the clouds:
Add a mask to each of these layers and use a soft black brush with the opacity about 20% to blur the top of the rocks to make them fade a bit into the clouds:

Use the Lasso Tool (L) to draw a jagged selection on the part near the top of the left rock and turn the foreground to white (still on the mask). Hit Delete to get the result shown below:
Step 3
Duplicate the right rock and move it to the left a bit and flip it horizontally (Edit > Transform > Flip Horizontal). Lower the opacity of this layer to 30%:
Duplicate the right rock and move it to the left a bit and flip it horizontally (Edit > Transform > Flip Horizontal). Lower the opacity of this layer to 30%:
Step 4
Add a mask to this layer and erase the part covering the first one. Also lower the brush opacity to reduce its visibility on the left side, making it fade completely into the sky:
Add a mask to this layer and erase the part covering the first one. Also lower the brush opacity to reduce its visibility on the left side, making it fade completely into the sky:
Step 5
Duplicate this layer and make it bigger. Move it to the left and lower its opacity to 10%:
Duplicate this layer and make it bigger. Move it to the left and lower its opacity to 10%:
Use a layer mask and remove the unnecessary details (the part covering the second one) and decrease its opacity to make it more faded than the existing ones.
Step 6
The right rock lacks details and light, especially light from the background, will reflect more on it. Create a new layer (set as Clipping Mask), change the mode to Overlay 100% and fill with 50% gray:
The right rock lacks details and light, especially light from the background, will reflect more on it. Create a new layer (set as Clipping Mask), change the mode to Overlay 100% and fill with 50% gray:
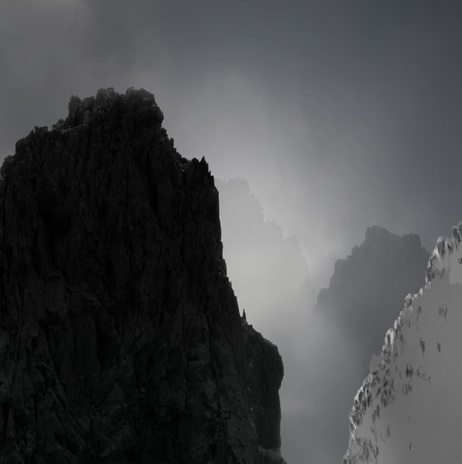
Activate the Dodge and Burn Tool (O) with Midtones Range, Exposure about15-25% to draw more details on the rock, and also paint its highlights on the front. You can see how I did it with Normal mode and the result with Overlay mode.
Step 7
Select all the rocks and their relative layer (Dodge and Burn one) and press Control-G to make a group for them. Change this group from Pass Through to Normal 100%. Create a Curves adjustment layer to brighten the rocks:
Select all the rocks and their relative layer (Dodge and Burn one) and press Control-G to make a group for them. Change this group from Pass Through to Normal 100%. Create a Curves adjustment layer to brighten the rocks:
Select this layer mask and paint with a medium-soft black brush. Lower the brush size when you refine the details, light and shadow, especially on the right one. Here are the results on the mask and on the picture:
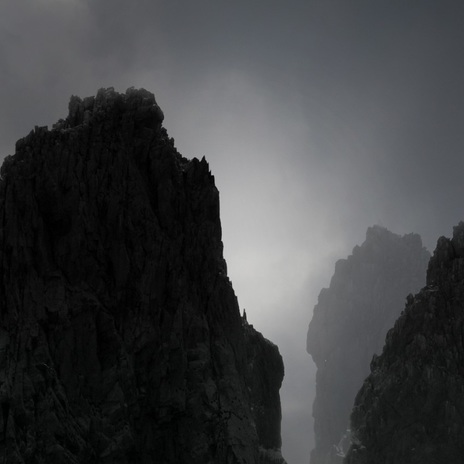
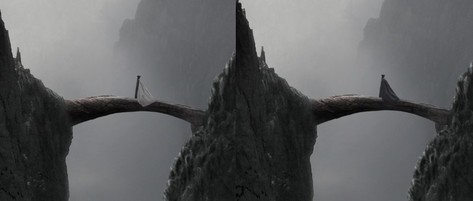
3. Add the Arch
Step 1
Open the arch image. Take the arch only using the Polygonal Lasso Tool:
Open the arch image. Take the arch only using the Polygonal Lasso Tool:
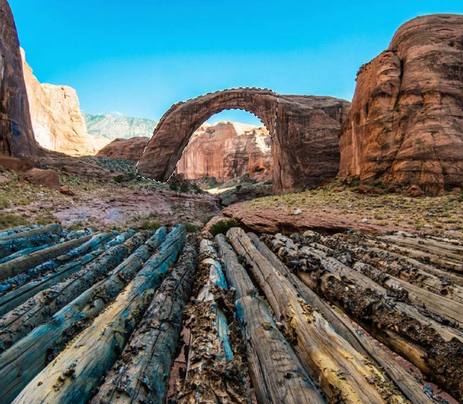
Place it in the space between the rocks on the two sides and use Control-Twith the Warp mode to make it less bendy than the original.
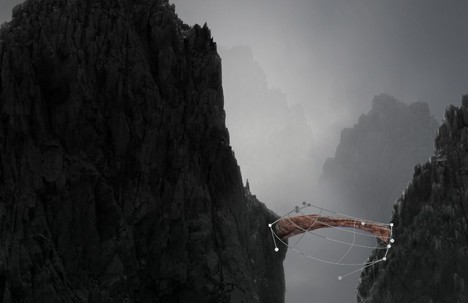
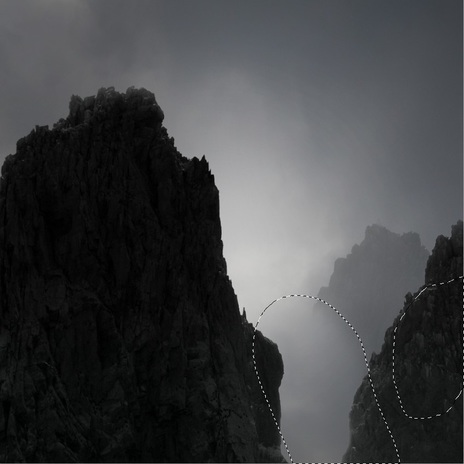
Step 2
Use a layer mask to blend it with the rocks:
Use a layer mask to blend it with the rocks:
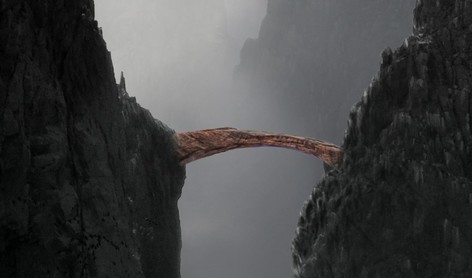
Step 3
Make a new layer, change the mode to Overlay 100% and fill with 50% gray. Use the Dodge Tool to bring more light to the front of the arch where the background light shines on it.
Make a new layer, change the mode to Overlay 100% and fill with 50% gray. Use the Dodge Tool to bring more light to the front of the arch where the background light shines on it.
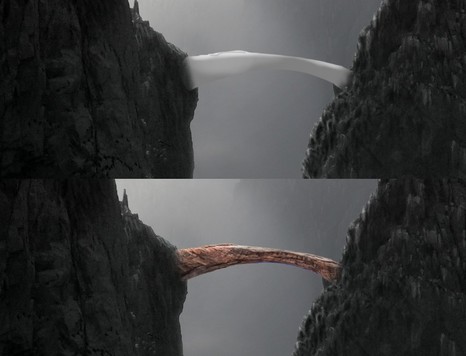
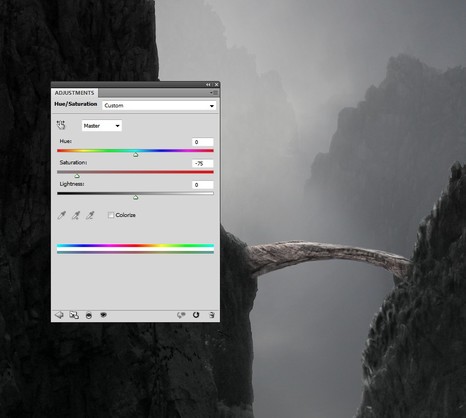
Step 4
Create a Hue/Saturation adjustment layer and reduce the Saturation value to -75:
Create a Hue/Saturation adjustment layer and reduce the Saturation value to -75:
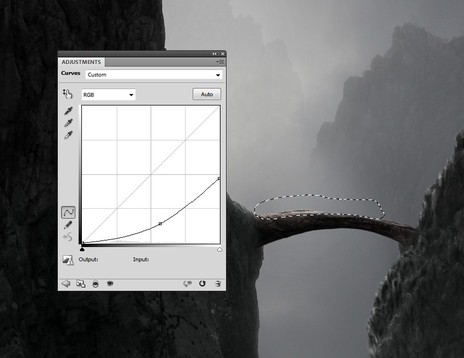
Step 5
Add a Curves adjustment layer and decrease the lightness. Paint on this layer mask to make the front still bright:
Add a Curves adjustment layer and decrease the lightness. Paint on this layer mask to make the front still bright:
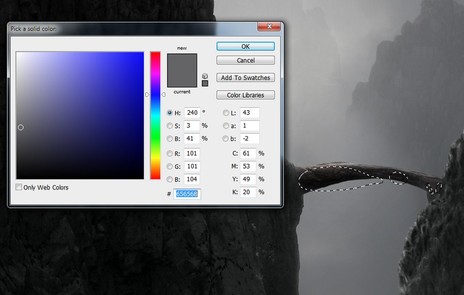
Step 6
Create a new Color Fill layer and pick the color #656568. Lower the opacity of this layer to 30% to add some subtle haze to the arch, because it looks more obvious than the rocks. Here are the parts to paint on the layer mask (the lower one).
Create a new Color Fill layer and pick the color #656568. Lower the opacity of this layer to 30% to add some subtle haze to the arch, because it looks more obvious than the rocks. Here are the parts to paint on the layer mask (the lower one).
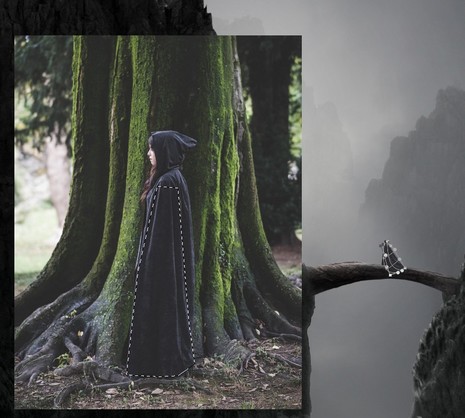
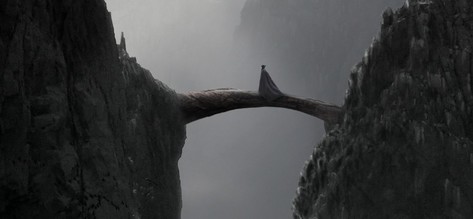
4. Add the Model
Step 1
Isolate the model from the background and place her onto the arch. Use Control-T to make her much smaller to fit the size of the arch:
Isolate the model from the background and place her onto the arch. Use Control-T to make her much smaller to fit the size of the arch:
Step 2
On the original model image, take the cloak part and add it to the model in the current document. Use the Warp Tool to bend the part to make a larger cloak for the model.
On the original model image, take the cloak part and add it to the model in the current document. Use the Warp Tool to bend the part to make a larger cloak for the model.
Step 3
Use the Dodge and Burn Tool to change the light and shadow a bit for the cloak.
Use the Dodge and Burn Tool to change the light and shadow a bit for the cloak.
Step 4
Create a new layer under the model one and use a soft black brush with the opacity about 30% to paint a subtle shadow on the arch:
Create a new layer under the model one and use a soft black brush with the opacity about 30% to paint a subtle shadow on the arch:
5. Add the Towers
Step 1
Open the tower 1 image and cut it out from the background. Add it to the current document and duplicate it several times. Place the towers in front of the rocks and lower the opacity of the ones placed on the misty rock (30%) to fit the atmosphere there.
Open the tower 1 image and cut it out from the background. Add it to the current document and duplicate it several times. Place the towers in front of the rocks and lower the opacity of the ones placed on the misty rock (30%) to fit the atmosphere there.
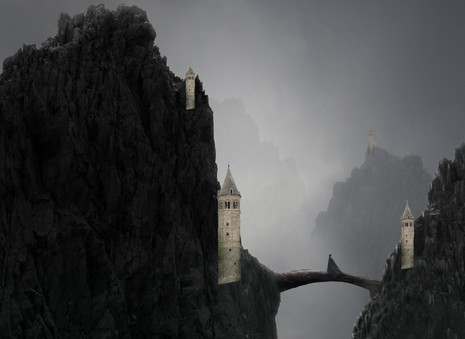
Step 2
Use the layer masks to blend the towers with the rock, soften the edges, and make them fade.
Use the layer masks to blend the towers with the rock, soften the edges, and make them fade.
Step 3
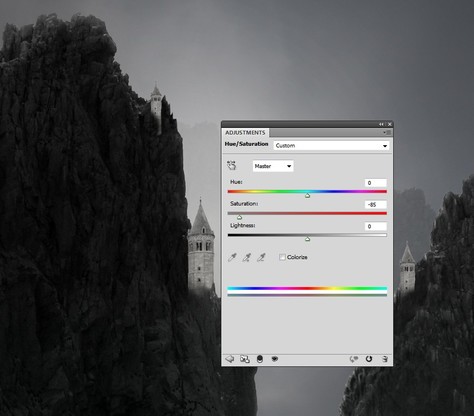
Make a group for the tower layers and use a Hue/Saturation adjustment layer to desaturate their existing color:
Make a group for the tower layers and use a Hue/Saturation adjustment layer to desaturate their existing color:
Step 4
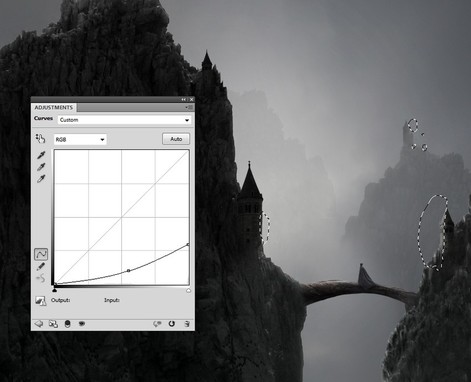
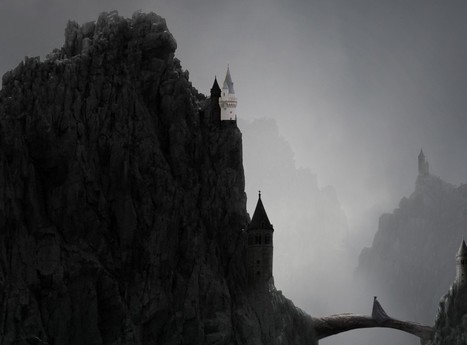
Use a Curves adjustment layer to darken the towers. Here are the areas to paint on the layer mask, mostly on the tower on the right rock and other illuminated sides.
Use a Curves adjustment layer to darken the towers. Here are the areas to paint on the layer mask, mostly on the tower on the right rock and other illuminated sides.
Step 5
Open the tower 2 image and take a tower on the top only. Place it beside the tower on the top of the left rock.
Open the tower 2 image and take a tower on the top only. Place it beside the tower on the top of the left rock.
Blend it with the rock using a layer mask:
Step 6
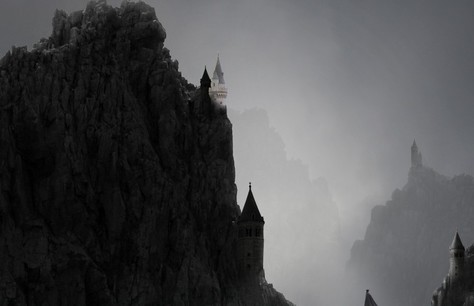
Make a Curves adjustment layer and reduce the lightness a lot. Paint on the front of the tower to keep a subtle reflected light shown on there.
Make a Curves adjustment layer and reduce the lightness a lot. Paint on the front of the tower to keep a subtle reflected light shown on there.
6. Add the Birds
Open the birds file and with the magic wand select the white background. Next you will need to select > inverse the selection so that you now have only the black birds selected. From here you can either copy and paste the birds into your canvas or with the move tool selected, drag the birds into your final canvas. Once inserted make them small so they seem far away. You may also duplicate the bird layer and move them slightly to make it look like there is a bigger group of them.
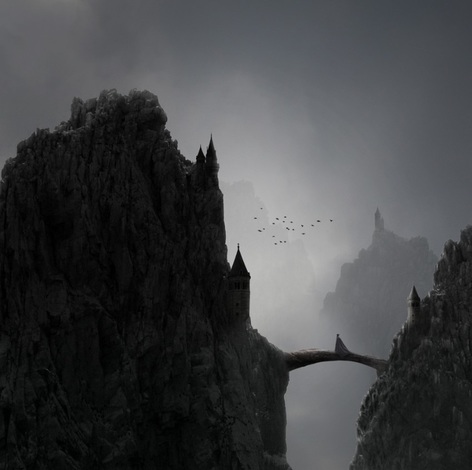
Make a group for the birds, and lower the opacity of the group to 70% (the right opacity to make the birds integrated better with the background but not be hidden from it).
7. Make the Mist
Step 1
Duplicate the sky layer and move it to the top of the layers. Lower the opacity of the layer to 70%:
Duplicate the sky layer and move it to the top of the layers. Lower the opacity of the layer to 70%:
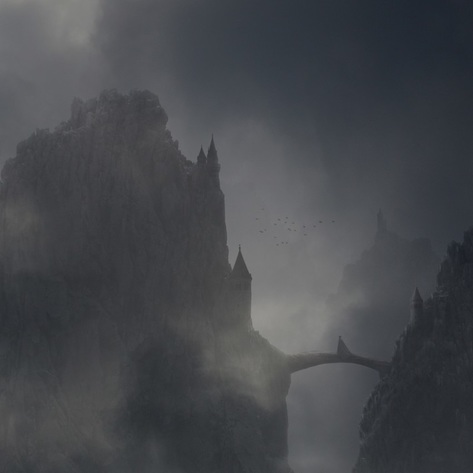
Step 2
Add a mask to this layer and reduce the mist intensity. Lower the brush opacity when painting on the rocks area to leave some mist there.
Add a mask to this layer and reduce the mist intensity. Lower the brush opacity when painting on the rocks area to leave some mist there.
Step 3
Use a Curves adjustment layer to make the effect brighter. The screenshot below shows where to paint on the layer mask:
Use a Curves adjustment layer to make the effect brighter. The screenshot below shows where to paint on the layer mask:

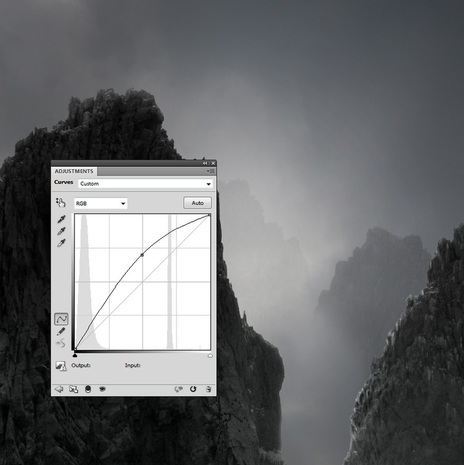
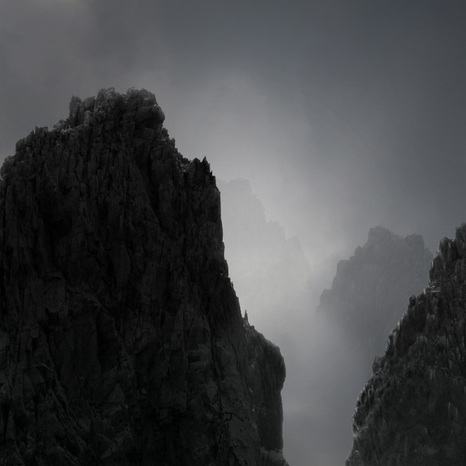
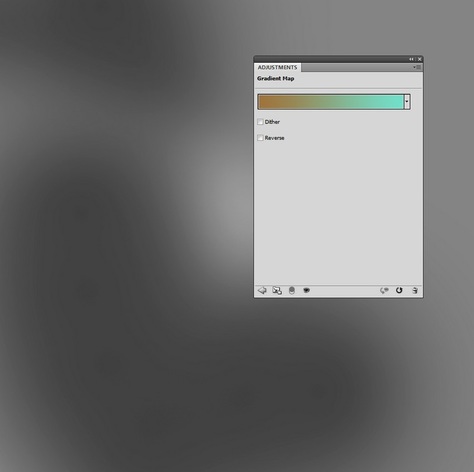
8. The Final Adjustment
Step 1
Create a Gradient Map adjustment layer on top of the layers and pick the colors #a1753c and #73e2cc. Change this layer mode to Soft Light 100% and reduce the effect by painting on the mask:
Create a Gradient Map adjustment layer on top of the layers and pick the colors #a1753c and #73e2cc. Change this layer mode to Soft Light 100% and reduce the effect by painting on the mask:
Step 2
Make a Color Balance adjustment layer and change the Midtones andHighlights settings:
Make a Color Balance adjustment layer and change the Midtones andHighlights settings:


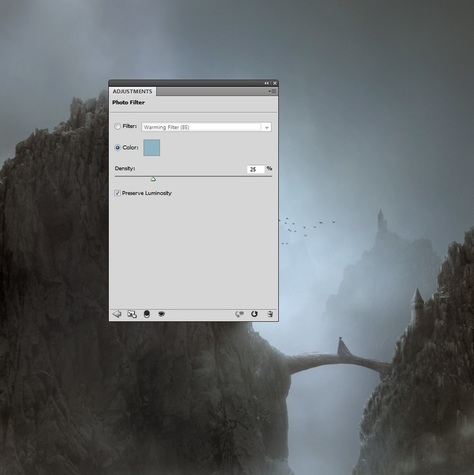
Step 3
Add a Photo Filter adjustment layer and pick the color #8db5c5:
Add a Photo Filter adjustment layer and pick the color #8db5c5:
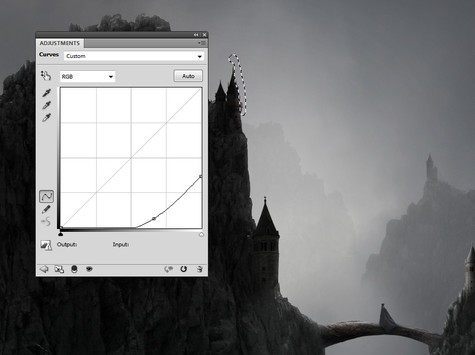
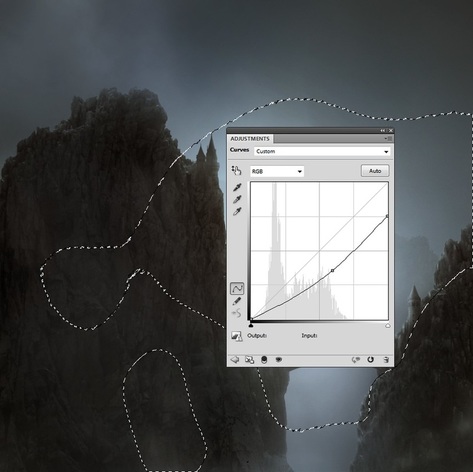
Step 4
Create a Curves adjustment layer and bring the lightness down. On its layer mask, paint on some parts to keep the brightness there, mostly on the light area:
Create a Curves adjustment layer and bring the lightness down. On its layer mask, paint on some parts to keep the brightness there, mostly on the light area:
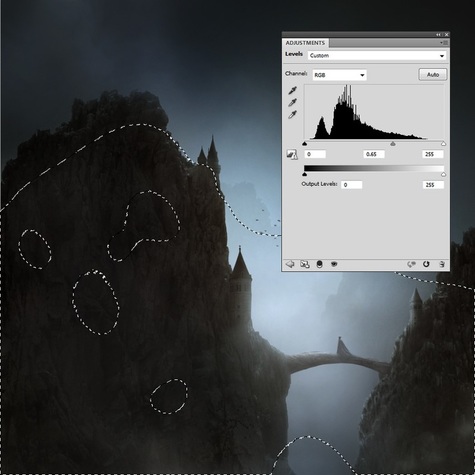
Step 5
Use a Levels adjustment layer to make the upper part darker and increase the contrast. Paint on the lower part and the light area so that they're not affected by this adjustment layer:
Use a Levels adjustment layer to make the upper part darker and increase the contrast. Paint on the lower part and the light area so that they're not affected by this adjustment layer:
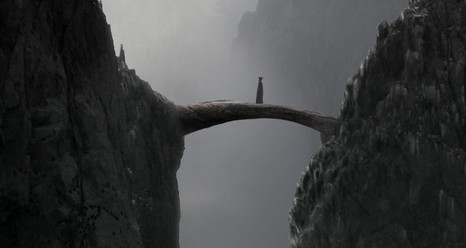
Congratulations, You're Done!
Well done! Make sure you save your work and submit it to the FINAL MISTY LANDSCAPE folder with your name as the file name.